
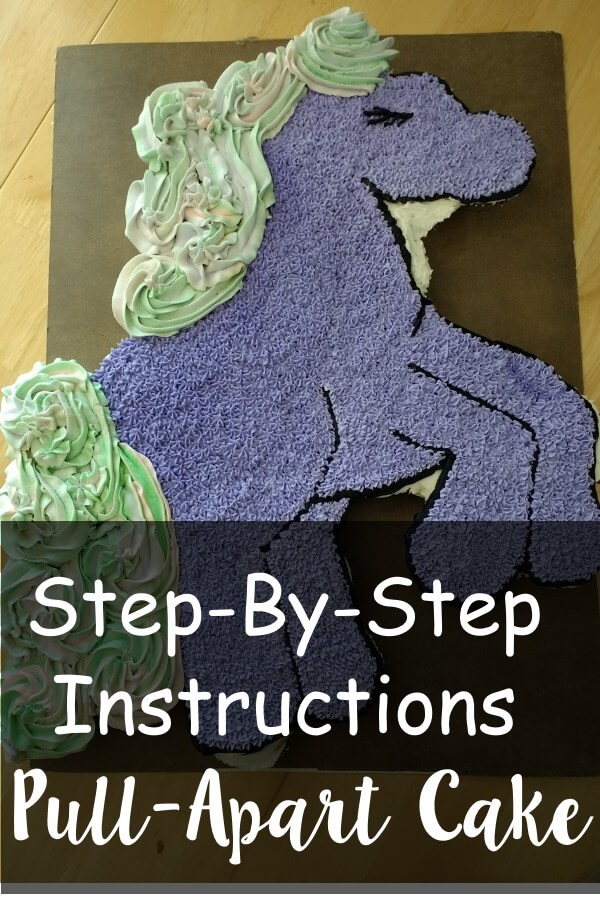
I know, I know. Unicorns are white, not purple. That’s what I tried to explain to my daughter. But hey, if that’s what she wants! Here are step by step instructions for making your own Unicorn Cupcake Cake. Change the color and make it any of the My Little Pony Cupcake Cake.
Getting the proportions correct to make the outline of the unicorn is imperative to your finished product. To make it look good, you have to get the outline pretty close. So, figuring out how to line up the cupcakes is important.
I did not want the neck of the horse to be too thick. I also wanted the back of the pony to show so that the mane was separate from the tail.
Here are some quick links to getting supplies, particularly for using icing tips.
- Reusable Piping Bags or Disposable Piping Bags
- This Set of Icing Tips includes all tips you’ll need including the bigger 2D for the mane, or hair
- Gel Food Coloring
- Cupcake Liners – these Rose Gold Foil ones are perfect
- Funfetti Cupcake Mix
Lining Up the Cupcakes for Your Unicorn Cupcake Cake
I lined up the cupcakes to the general shape of the pony, using 37 cupcakes total (I later took one out so it really ended up being 36 cupcakes but I’ll cover that later). Half were strawberry and half funfetti, using the strawberry mainly for where I thought I was going to put the hair to help visualize.

This all fit on a 16.25 in x 22.25 in mat that I found.
To further help me visualize, I placed long sheets of paper over the cupcakes and with pencil outlined the outer cupcakes, then sketched the pony in. Since you get to sneak a peek at where this laid out for me on the cupcakes, you can skip this part unless you want to change the shape.

Some Helpful Tips!
I did measure out about ¼ cup of batter into each cupcake liner but I wasn’t exact. Instead, right when the cupcakes come out of the oven, I placed a damp, warm cloth over them and then with something flat (the cupcake mix box!) I pressed down for 30 seconds to make the tops flatter. Again, don’t worry if they aren’t completely flat.
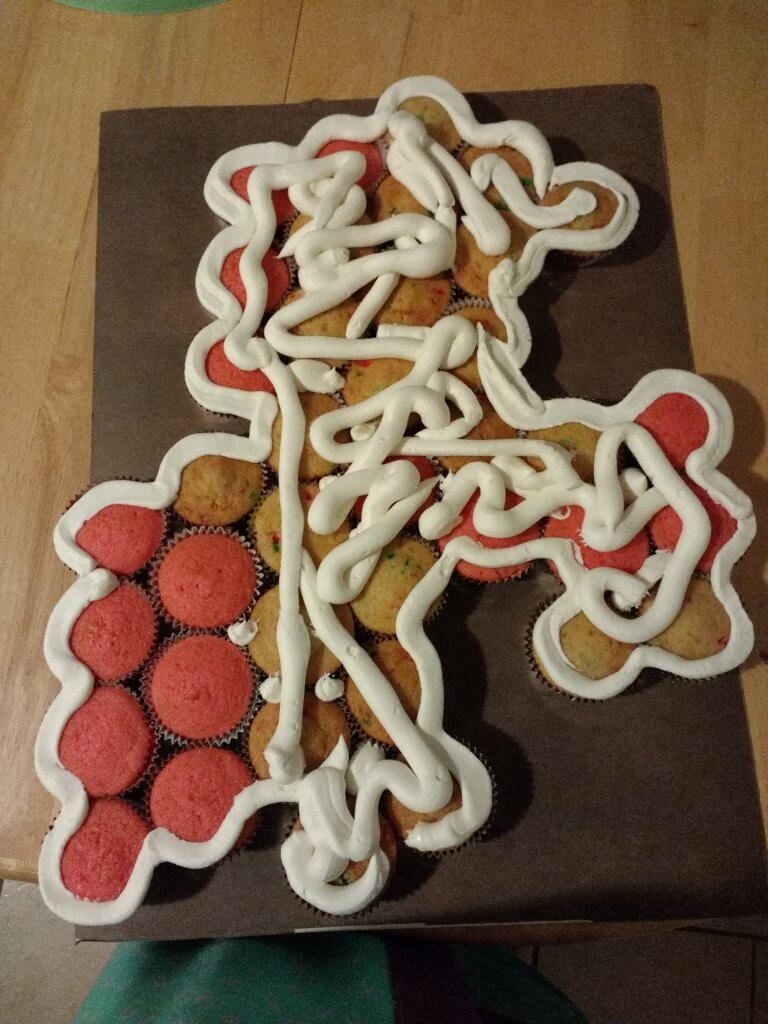
Once you have the cupcakes lined out where you want them for your unicorn cupcake cake, ice the bottom of the cupcakes one at a time and put them back. You don’t need much, but instead of just a dot, ice a small circle. This will keep the cupcakes in place. Smush them together to make them tight.
Where there are bigger gaps and holes, squirt icing to make a bridge between the cupcakes. You don’t want a lot of gaps but this really isn’t a big deal if you need them for placement purposes. I found that the icing won’t stick to the sides of the cupcakes much so it isn’t messy.
Icing the Base Layer of Your Unicorn Cupcake Cake
With a thick icing tip (like Tip 2A or not using one at all, just the bag), ice the outline of the unicorn. This will help get the icing all the way to the edges. I skipped the mane and tail because with that different icing technique you don’t need it there (I thought of this after so that’s why I scraped it off).
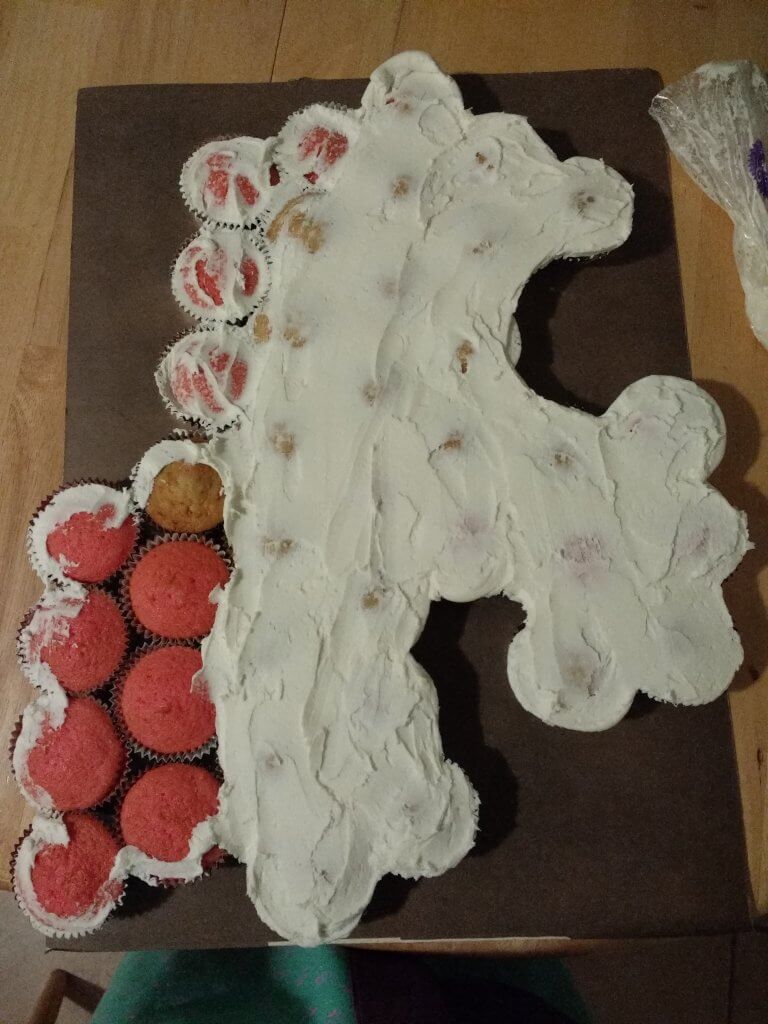
Then squeeze out plenty of icing over the rest. You can easily scrape off extra so don’t worry about the amount. Take a knife, spatula, or long tool with a straight edge and smooth all that icing around. I didn’t want to end up with a thick layer of icing only to decorate on top of that so I pared back the icing a lot. I even left the tops of cupcakes showing. This will give you a generally flat surface to work on and the decorative icing on top will cover up the rest of that unevenness.
I love this icing recipe. This recipe says to mix it for a long time to get it light and fluffy. I don’t like heavy icing that weighs the cake down after decorating. It also makes for a better taste.
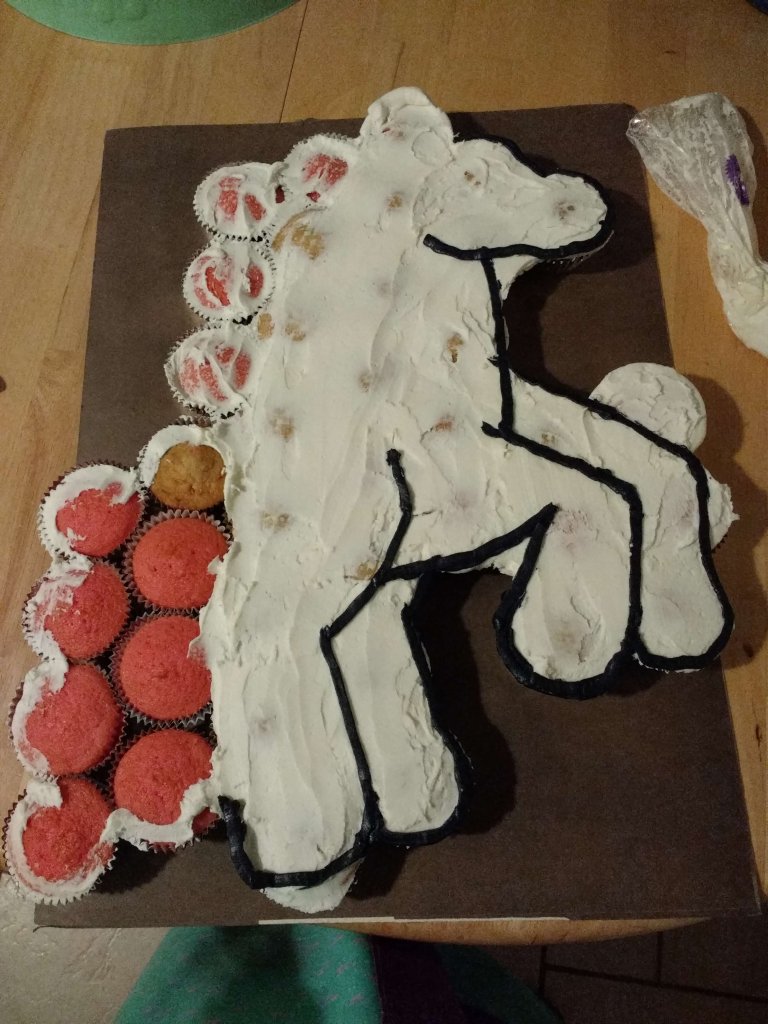
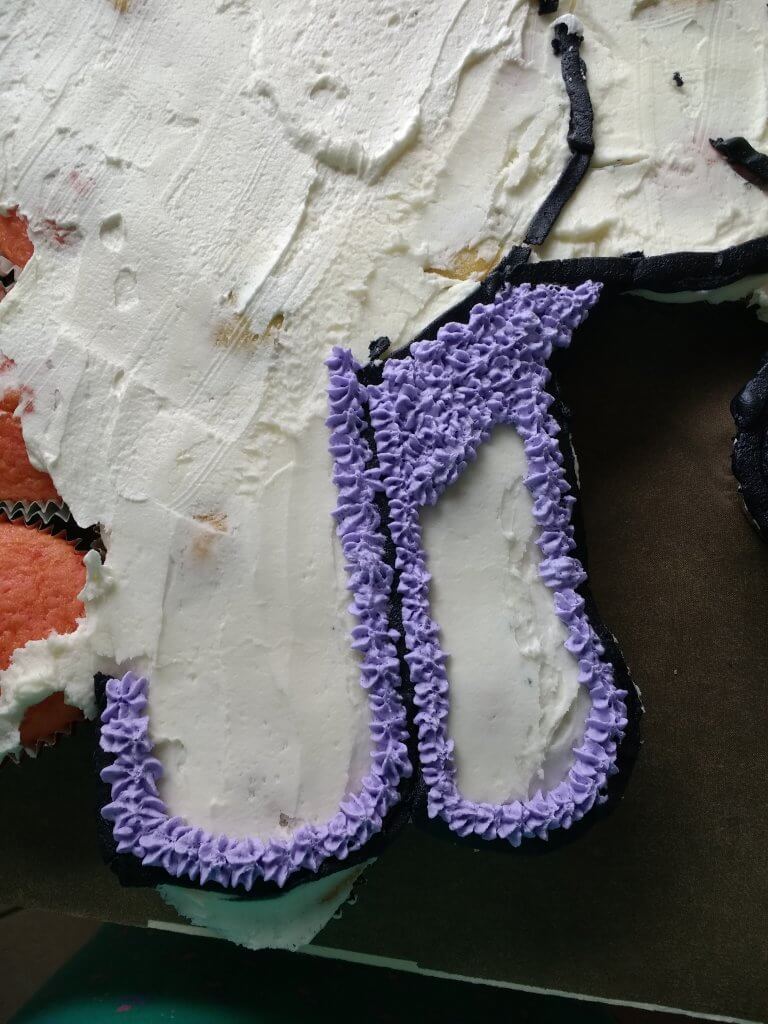
Icing the Black Outline of the Pony on the Cupcakes
Take a knife and “draw” the outline of the pony on your white layer of icing before going over in black icing. Many people use black gel icing for outlining on cakes, but I simply put a small (you need very little for this part!) amount of icing in a bowl and mixed in black food coloring. I used a flat tip to make it wide instead of a skinny outline that wouldn’t be noticed when decorating over it. I used Wilton Tip 103 but 104 will work too if you get the set I referenced above. Also, the black icing color will take a few minutes to deepen. You may have to add a little more than you think but then let the icing rest for 10-15 minutes and the gray will deepen to black.
Tip: I have found that buying the correct food coloring color is much better than trying to mix colors to get what you want- for most colors. It’s easy to make pink from red, like I did here on the hair, or a lighter version of the color you buy, but don’t go mixing yellow and blue to get green, etc. It can work but it’s difficult to get what you want and it’s easy to waste icing trying to get the right mix. It’s not that expensive to just buy the right color. On this cake I used black, red, violet, and kelly green. Four colors at $1.75 each with plenty left over to use on multiple cakes in the future. Here is a great set of icing colors to have.
Final Steps to the Unicorn Cupcake Cake
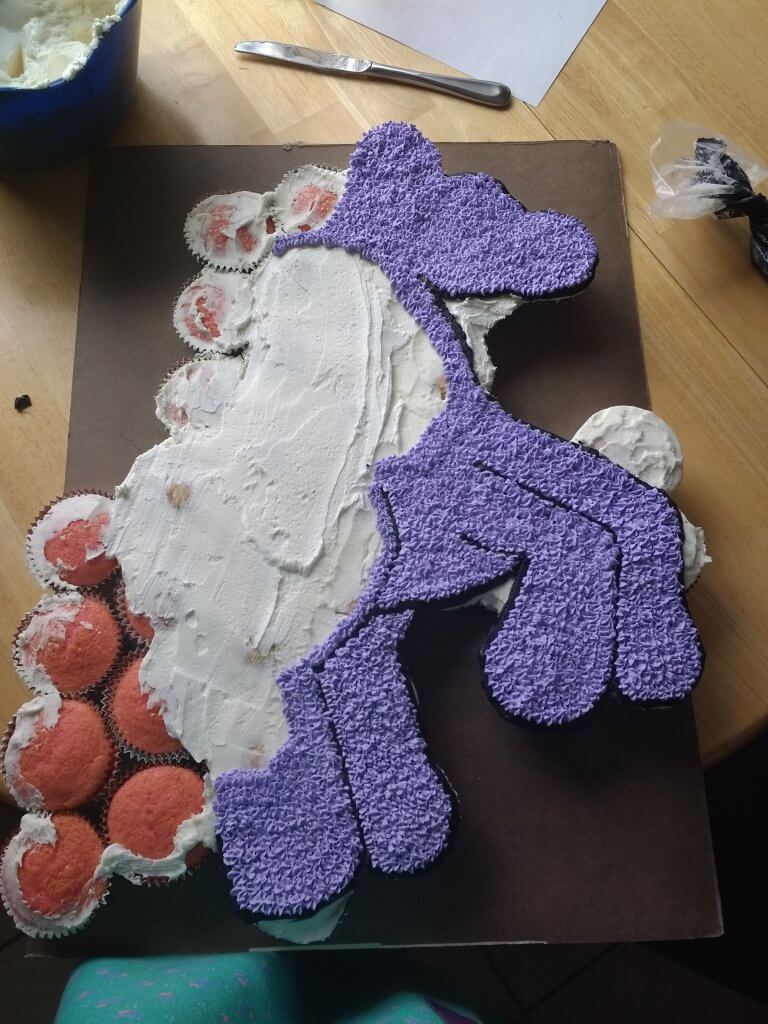
You’re almost finished! Your Unicorn Cupcake Cake is really taking shape. Decorative icing took maybe 30-40 minutes, if that. It was fast. The small purple stars don’t need to be perfect. In fact, there were a few people who were admiring my cake a little too close and bumped into it. I know, really? But it doesn’t matter! You don’t notice. Just go fast- small dots. Use a tip like 17. It works better if you touch, squeeze, lift. Place the outer line of the body (purple for me but white if you want the white unicorn cupcake cake look) halfway over the black outline, or as much as you want.
(I accidentally iced a little further than I needed to at the top … no biggie, the hair goes right over it.)
The hair was fun! Don’t worry about sticking to individual cupcakes- you want to blend. Use tip 1M or 2D. Pull it down as hair does and swirl at ends. Swirl the bottom areas first, then layer the top over the bottom. I got the swirl of color by spooning chunks of pink, purple, and green alternately into the piping bag (push the color to the side of the piping bag so it isn’t just layered).
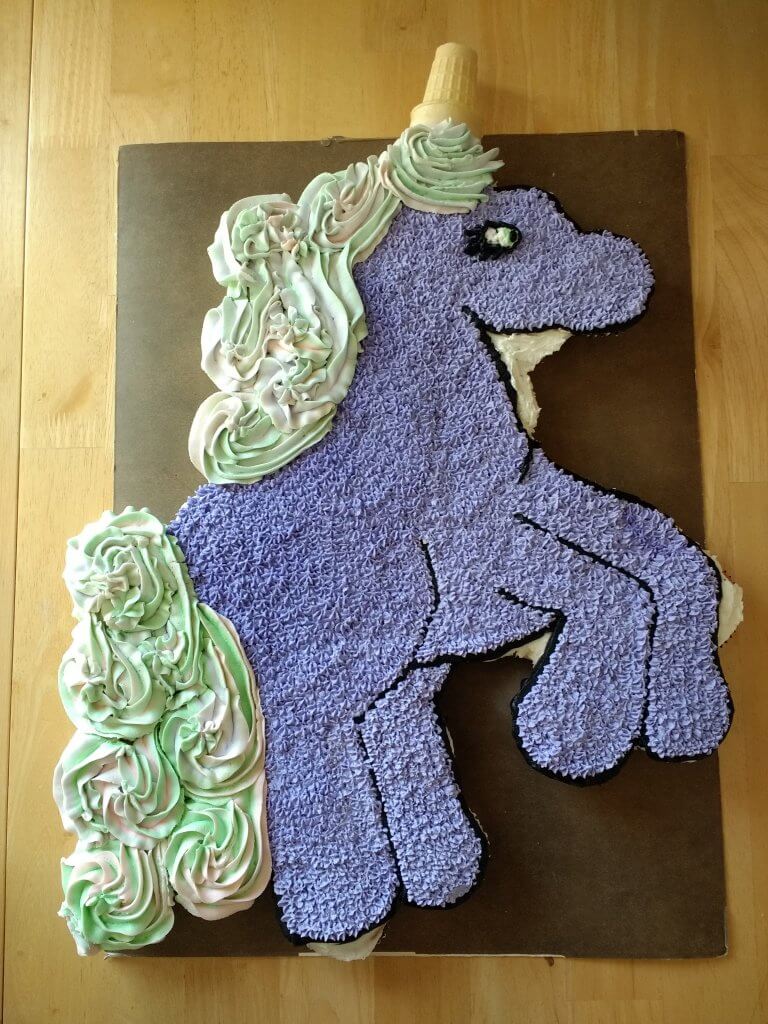
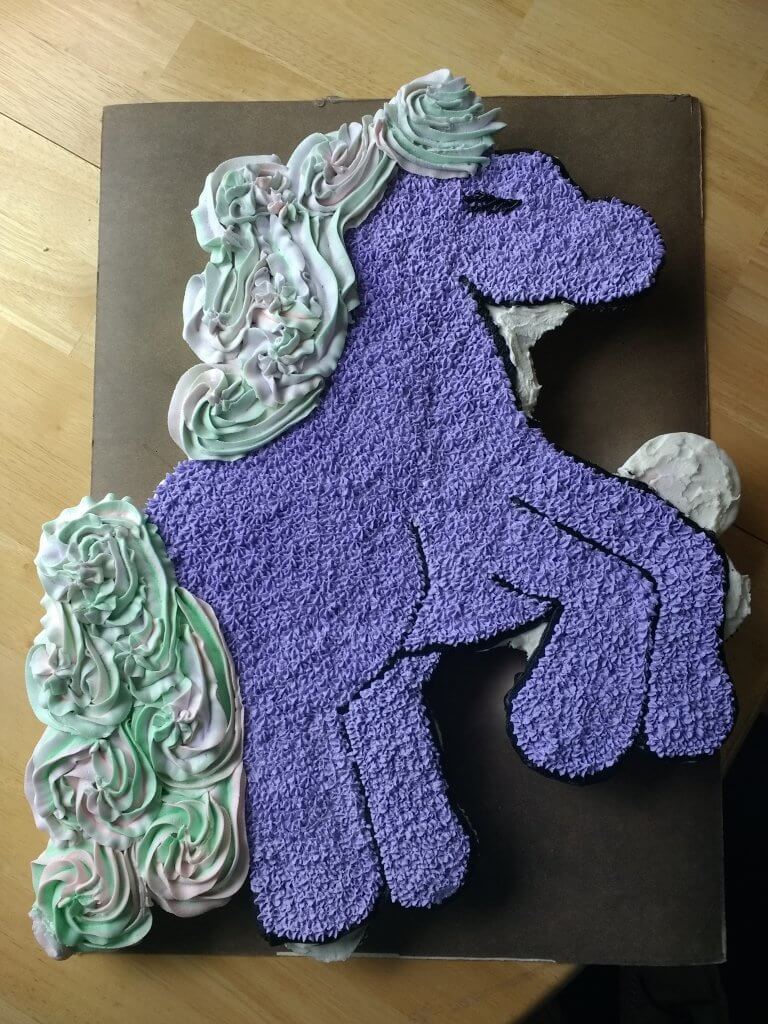
To make the eye quick and easy, I used a small round tip and did a closed eye, as you can see above. Daughter wanted an open eye, so I did go back and make an open eye. Why not, right? I wanted to make the horn easy, so I cut one of the ice cream cones in half and stuck it on top. A waffle cone would look more like a proper horn (this is what I had on hand).
Wilton tips 2D or 1M will give you great results for the hair. Any of the smaller star tips will work for the body of the unicorn or pony. Tips 17, 225, 18, 30- any of these will give you a medium-sized star shape. Tip 103 or 104 for outlining in black. Tip 2, 3 or 4 for the eye. This set, which I listed earlier, includes tips 2D, 104, 18, 3 (plus a coupler for changing out tips).
What I Would Do Differently
It’s not too difficult to make little changes after you start. You can see that I did! Making the neck on the pony or unicorn will make it look odd and out of proportion. It’s okay to leave a little white showing in order to make the outline of the pony just right. I preferred to have the back of the pony showing and not running the mane into the tail hair.
I ended up taking out that huge white cupcake, you may have noticed, that’s right above the front leg. It wasn’t necessary- so little of it was part of the pony. I slid it out and just squeezed icing underneath with a piping bag to hold up the top layer of icing. Then, I realized that I should have made those legs higher or bigger. Oh well!
So, here is what I would have done different. Make the hind leg not so big- bring the line in more so it’s skinnier. Draw the line of the stomach up into more of a “U” shape, and make the front leg a little higher (make it thicker … probably by spacing out the cupcakes that make the front legs).
And you have your Unicorn Cupcake Cake I hope this really helps. Good Luck!! Post your cakes in the comments.
Save THIS PIN below to your Pinterest Cupcake Cake board for later!
Deborah Johnson
Hello, you have no idea how you saved my life. I was asked to make this cake for a 3 year old, I had no idea what I was doing, but I didn’t want to tell the client that I didn’t know how to make it. so i accepted the assignment praying that I could pull it off. After researching, I found your page, and it saved my life. Thanks so much, I have attached a pic, mine is not as good as yours however, the client was very pleased which is all that matters. You are the best,
Julie
This makes me so happy to hear! I’m glad you shared.
Andrea S
Thank you so much for these instructions…..you saved me….lol….it cane our great and my customer was VERY happy 😊😊😊😊
Tina Tice
What decorating tip did you use to do the mane and tail? Making one this weekend for my niece
Julie
I’m so glad you asked! I used either Wilton Tip 2D or 1M. I wish I could remember which (more likely it was 2D) but either one will give you very similar results. I just went back and added tips suggestions through the How-To. Of course you can find them all cheaper at Walmart, but I also added a list of supplies near the beginning for convenience. Hope this helps!
MARY BROOKS
Where did you find the 16.25 × 22.25 mat for the cake?
Julie
Here are some ideas if you are struggling to find a base for your cupcake cake that is the right size. Cut a cardboard box to size. If the cardboard box has a crease in the wrong place then reinforce that spot by taping another piece of cardboard underneath. Foam board is awesome.
You can cover whatever you use with nice paper, wrapping paper, parchment paper, or aluminum foil. Just keep in mind that your cupcakes and especially icing will make a wet ring around your cake and icing on most types of paper, even parchment paper, and possibly on cardboard too. This (check out my Elsa doll cake is an example of the wet ring that happens – for that cake I turned a large cookie sheet upside down and taped parchment paper to it. It won’t show up right away but after a few hours. Aluminum foil or foam board won’t have this problem. My mat didn’t have this issue because of the coating on the back side.
Jaime Lynne Corle
Thank you for all the tips. I just made this for my daughters 9th birthday and everyone loved it.
Rosa
Thank you for sharing your knowledge.
Very well done.