
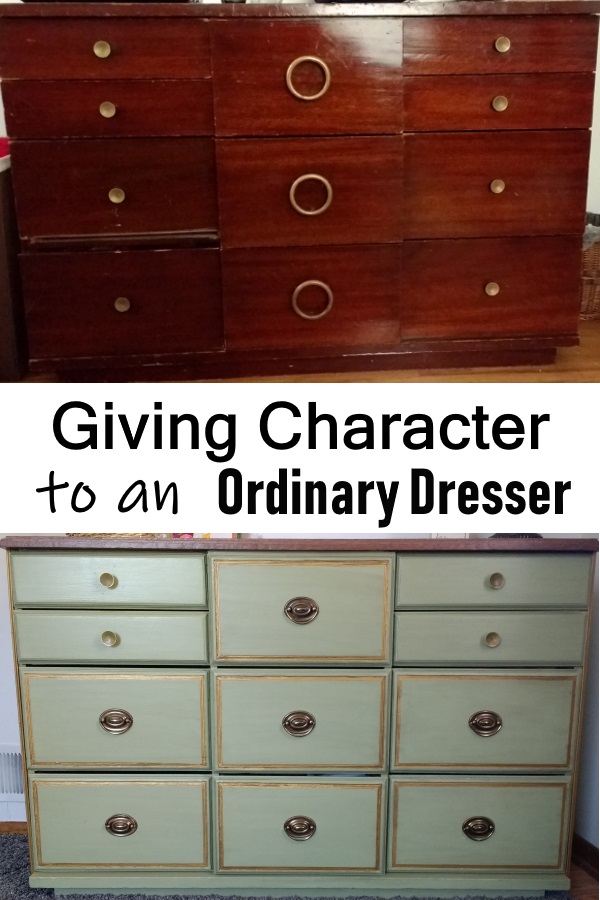
Old Dresser Makeover With Steps
I took an outdated, ugly old dresser and gave it a complete DIY dresser makeover. There’s a story behind the dresser- why I had it and why I decided to keep it for an old dresser makeover. After I describe the aesthetic problems with the dresser before, I’ll go into the prep work I did, a brief list of materials, and then all of the steps through the DIY dresser makeover. You should come away with some great how-to and inspiration for your own project.
The Story Behind The DIY Dresser Makeover
This dresser was essentially a hand-me-down from my husband’s grandfather. That’s the nice way of saying it. In reality, nobody else wanted it so my husband claimed it before it was hauled off. We were newly married and broke with no furniture, so it stuck around for several years.
Every time I looked at it I couldn’t help think about how the poor thing needed help. And I looked at it a lot since it was the only piece of furniture in our bedroom. We eventually made it into our first home and had mostly furnished the rest of the house. When I finally got around to updating our bedroom I had mixed feelings about this dresser.
My husband was ready to get rid of the old dresser and upgrade. Likely anything would have been an upgrade. I wanted the challenge of giving the old thing new life, a good DIY dresser makeover.
I couldn’t bring myself to just toss it or give it away. WHY? Because the drawers were so deep, which I liked, and I couldn’t find anything else that had deep drawers or was the same height or gave the same amount of space in one stand-alone dresser. (Plus, I needed the challenge, really.) So I planned to replace the nursery dresser with this one, once I gave it a DIY dresser makeover.
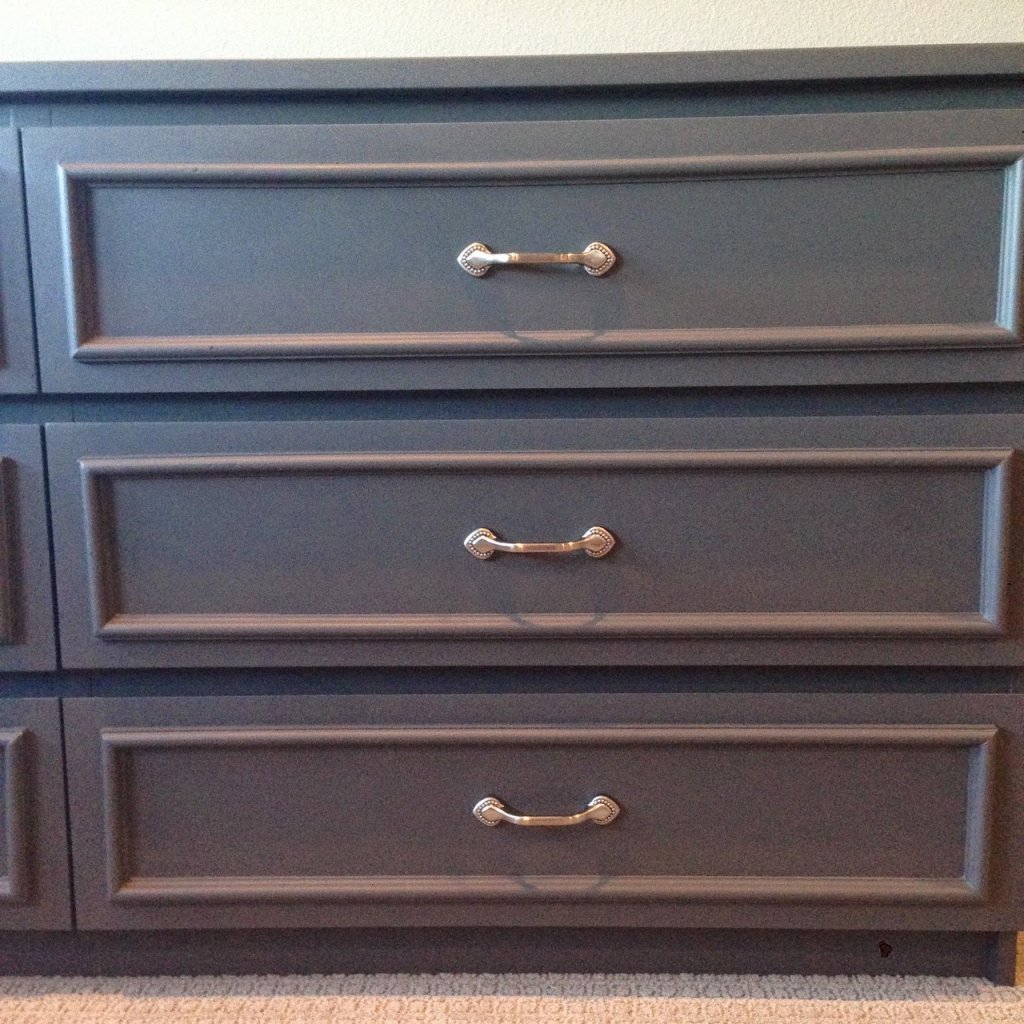
The Aesthetic Problems Of The Before Dresser
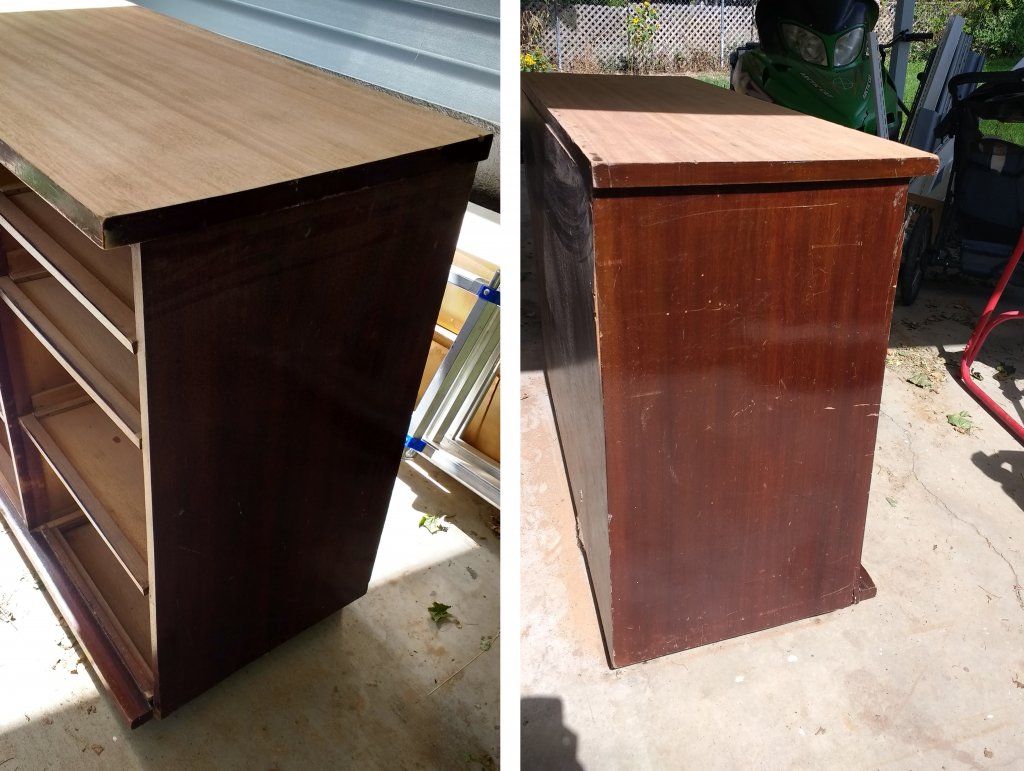
It was incredibly boxy! Look at the thing. Absolutely no curves or character. Flat on every surface. It’s design is boring and the handles are more hideous than useful. I hated that the middle drawers stuck out beyond the side drawers. A simple coat or two of paint would not be sufficient for this true DIY dresser makeover.

And, yes, that drawer on the left side second from the bottom had a piece of the bottom broken off. Yikes!
I sketched all the changes I had in mind. I thought about ways to give each surface added dimension instead of staying flat.
Prep Work For The DIY Dresser Makeover
I started with roughly sanding the whole dresser. For the top, I wanted to keep the natural wood and simply apply a clear polycrylic protective finish. It is real wood (not veneer) and the wood has a beautiful grain. Because of that, I sanded the whole top really well. But just the top, not the side edges of the top. On my edges I was going to use a router so I didn’t worry about sanding it.
On the sides of the dresser I wanted to add trim so I roughly sanded that down on the outer edges. I like to avoid sanding when I don’t have to but I went ahead and sanded the dresser tops too because I would be working with them a lot. It was pretty quick. I used a ryobi which always makes the job quick and simple.
I found a piece of scrap wood and cut it to the size of the dresser tops, then glued it to the dresser drawer that had been broken. Below I’ll explain how to add wood on wood like that. It has held up really well, almost two years later. In fact, I had forgotten about it except for the before pictures. With paint over it you can’t even tell.
And then I wiped it down for a clean surface. All of the sanding took maybe an hour and half if that.
Brief List Of Materials And Tools
- Ryobi Sander
- Dremel with Router Bits (+ Other Bits that the Dremel comes with for random cutting)
- Wood Saw
- Clamps
- Wood Filler
- Wood Glue
- Acrylic Gold Paint
- Homemade Chalk Paint using a Sample Size Container of Sanctuary in Behr/ Paint Brushes
- Valspar Antiquing Glaze
- Polycrylic Water Based Protective Finish in Clear Matte
First Steps Through The Old Dresser Makeover
Dresser Top
I routed the dresser top edges. For christmas a few years before this old dresser makeover, I got a handheld dremel. I figured out how to use it as a router! A router is a tool bit that cuts into the wood or along the edge of wood to give it fancy edging and detail.

Using The Dremel Tool
Let me tell you a little bit more about this dremel for a sec. It has all kinds of bit pieces that you can screw on and use for different jobs. For instance, I’ve cut metal with it, sawed wood pieces, sanded wood on detailed projects, drilled holes into the wall for hanging frame hardware, etc. etc. My husband and I have a running joke that I use it for ANYTHING! You can cut off stripped screws, clean off rust, polish all types of materials, and many people use it to make jewelry, just to name a few. Okay, before I let this dremel hijack my old dresser makeover (you can see how excited I get about this thing), you can check out other projects I’ve used the dremel on.
Dresser Drawer Details
Read here if you want the nitty gritty details about how I worked through the dresser drawers. If you prefer the quick and simple version, skip on to The Next Steps Working On The DIY Dresser Makeover
The dremel router worked pretty well for the dresser top. Fairly quick and simple. Once I finished the dresser top I decided to use it on the drawer tops for a wide, gradual tiered edge since the dremel router bit is meant for shallow grooves.
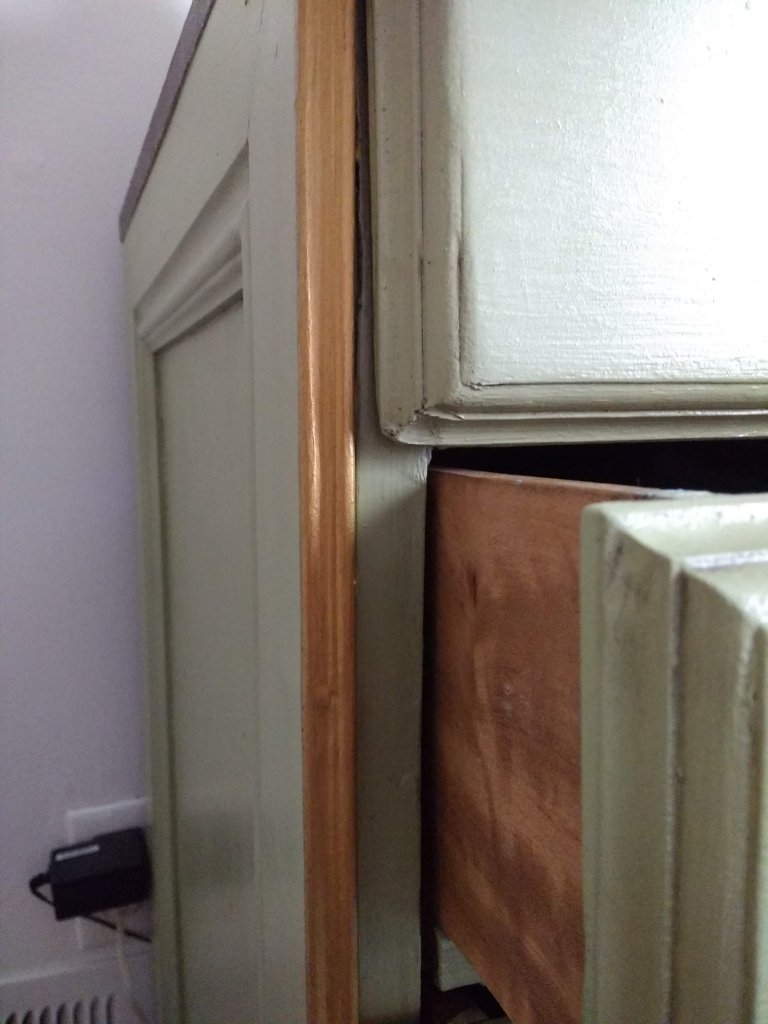
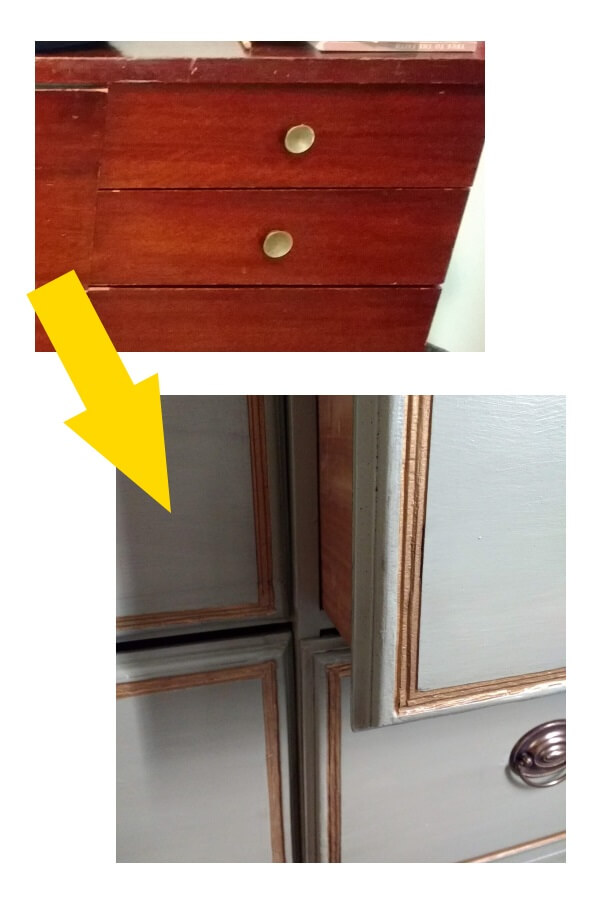
That ended up being a bad idea. The drawers were really thick and they were fashioned in a strange way so that one side (of the outside drawers only- why I overlooked this) was flesh where it met the side of the drawer- see photo for explanation- while the other side hung over like normal drawers do. The problem with that was I would end up cutting off the drawer edge where it connected.
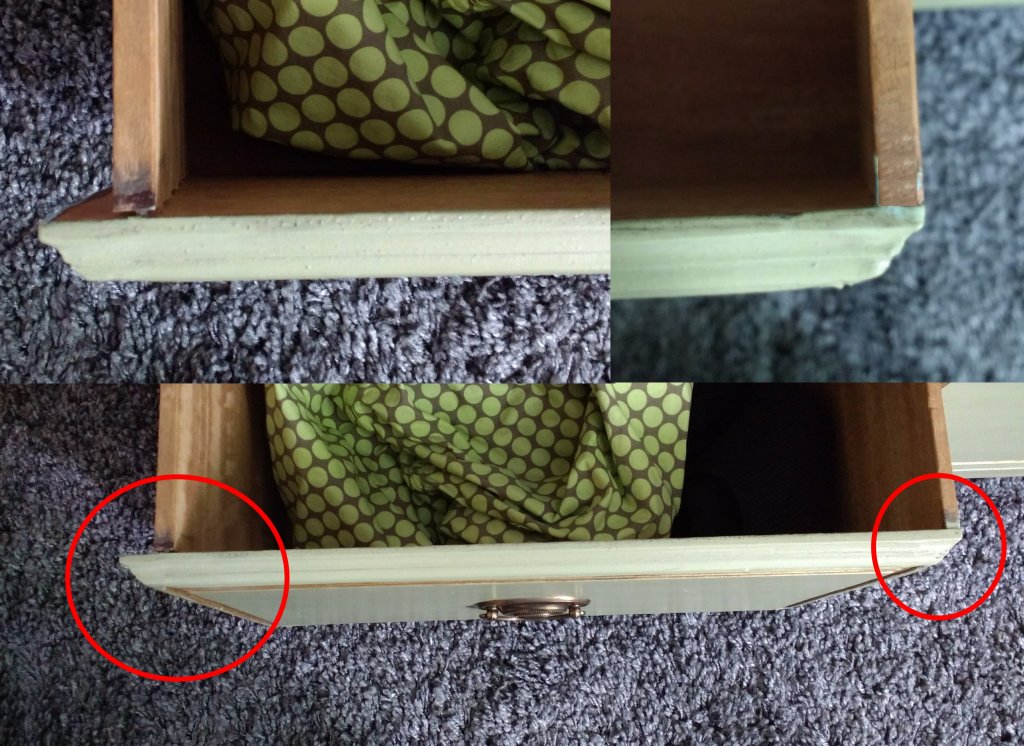
Bad on my part for not figuring that out before I started. What I ended up doing, before I went too far down that road, was moving the routed edge further out. I had to do something since I had already cut into some of the drawer tops. Instead of being a wide, gradual, tiered routed edge, I would have to make it shallow but deeper. That meant that I had to go find a bigger router at a friend’s wood shop to route it for me.
Design On The Drawer Tops
Since I had already started routing further inside on the drawer top also, with grooves, I finished it into a design. That ended up working out well. However, it was a lot of work. There are 11 drawers and I was cutting a groove three times on each side. This was my first time using the dremel router and the wood wasn’t that soft so it took several passes with some doing. I had to touch up some edges with wood filler.
That all being said, I bit off quite a large project. The dremel router is best for softer wood and if you want some big, deep edging you would need to buy a bigger router. A bigger router isn’t worth the expense unless you plan on a lot of DIY dresser makeovers that are similar to this one!
One more thing to note is that by cutting into the edge of the drawer top you end up shaving off at least some of the width of the drawer. As long as you keep that minimal the drawer top should still overlap the dresser frame as it needs to but you’ll have to check that on your furniture.
An easier option of what I could have done to the drawer tops instead of cutting into the wood to add character and detail would have been to glue and nail trim on. Here’s a picture of what that could add to your design of an otherwise bland drawer.
The Next Steps Working On The DIY Dresser Makeover
Drawer Tops
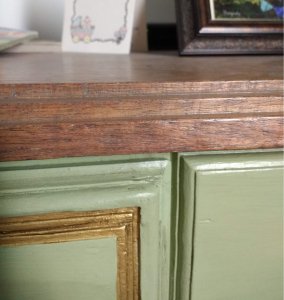
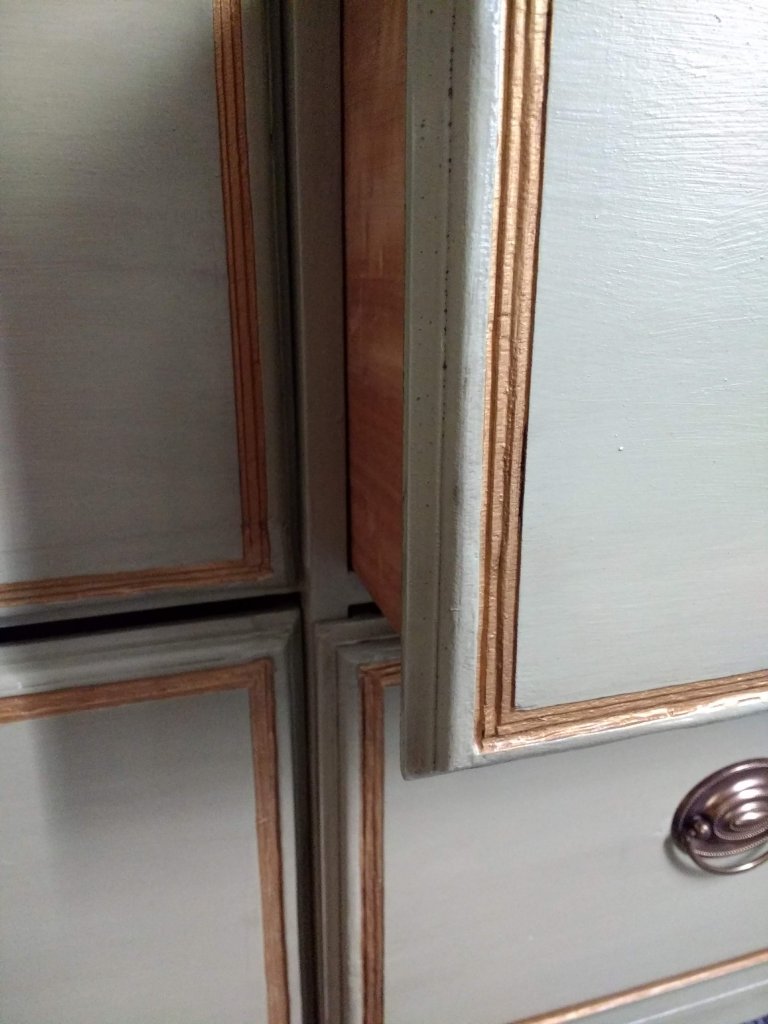
Okay. So, I routed (or cut) the edges of the drawer tops so they weren’t squared off anymore. And I routed decorative detail around the face of the drawer top. At the very end, I hand painted the detailing with gold acrylic paint to stand out and it was perfect.
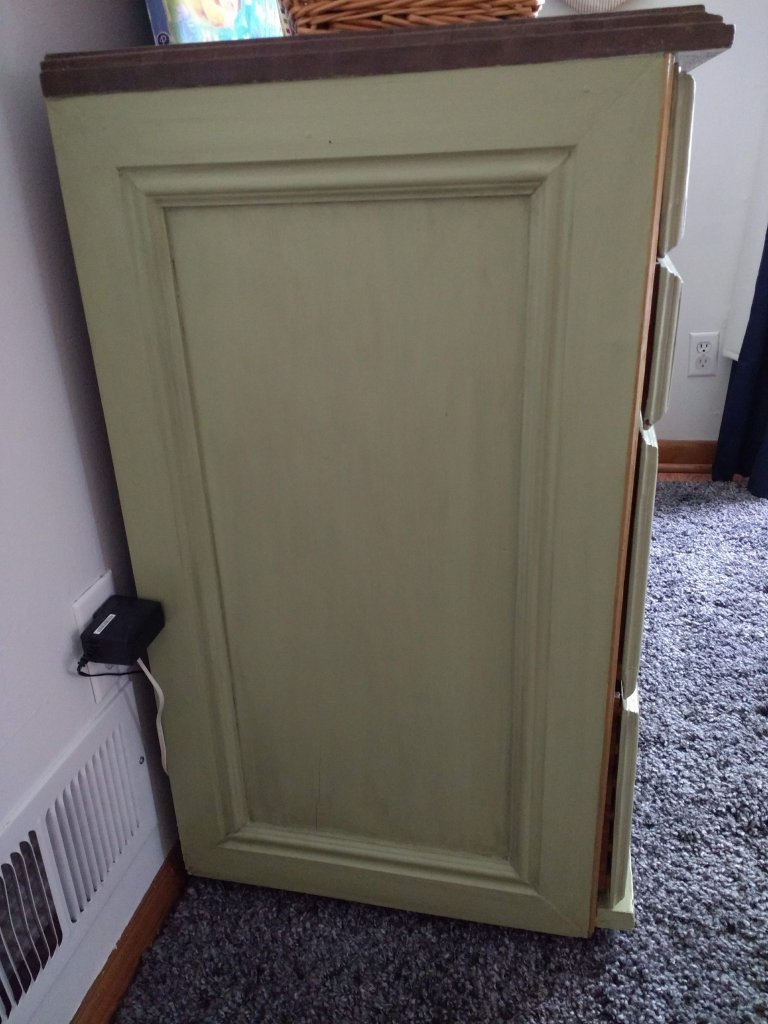
Adding Wood Trim To Dresser Sides
At Home Depot you can find wood trim for fairly cheap. It’s really baseboard trim but you can use it for all types of things. I cut the wood trim to frame the edges of the dresser. This dresser really was flat, plain, and boring in every way so I added extra shape and detail where I could.
I measured and cut all the pieces myself. I found measuring tricky to make the angles match up. It wasn’t perfect so I filled in the gaps with wood filler. Hopefully a professional wood maker doesn’t read this and shake their head at me! If you want quality work get help from someone who isn’t a novice. If you are okay with good enough, this does the job. Just be safe working with tools. The end product looks just fine, not even noticeable by me unless I get right up to the dresser and look for it, which never happens. I’m happy with the end result.
(By the way, I used a wood slicer bit on my dremel to cut some of the trim pieces and to touch up edges on the other pieces, in which case you don’t have to have a wood saw)
When you are adding wood on to wood, it’s best to sand roughly first. Then you use wood glue (a lot) plus finishing nails. If you can, you’ll also want to clamp the pieces together for several hours until it’s dry (but for the back of the dresser you would need big heavy wood clamps which you can probably get away without if you’re using finishing nails). For a drawer top you can use smaller clamps at Home Depot. Or you can maybe set something heavy on top of it instead.
Molding On Dresser Corners
After routing the edges of the drawers there was about a ⅛ inch of space left that exposed the sides of the dresser. It was perfect for adding skinny molding trim that I bought cheap at Home Depot.
This was simple too. Measure, cut, and glue. It wasn’t big enough for finishing nails but I did use clamps to hold it down while it was drying.
After I painted the whole dresser, I went back and painted this trim gold just like I did with the detailing on the drawer tops. The end result is awesome! It lets this detail stand out and ties in the drawer tops.
Replacing Hardware
Before painting, I filled in the holes where the old dresser hardware had been. This is quick and simple. You stick the wood filler in the holes (put your hand behind the hole to keep it from coming out that side) and wipe it flesh on the top surface but be sure it covers any cracks from the holes. It does need time to dry, lightly sand after if needed.
I kept the drawer pulls for the smaller four drawers. I bought new handles for the other drawers. Measure to place them center and then drill new holes.
Legs? For The Old Dresser Makeover
I attempted to add legs for the old dresser makeover, but this dresser didn’t quite have the structure to do it. The bottom on the dresser was only solid wood along the edges. The rest of it was a cheap, thin wood that wouldn’t have been a good hold for the legs.
You can buy furniture legs at almost any hardware store or online. They usually have a metal plate attached to screw the legs in to the dresser.
Paint and Protective Finish
On the wood top I applied a polycrylic protective finish. I loved this because the wood was beautiful and didn’t need anything but a finishing, protective layer. I used a clear matte, which I feel is hard to find in-store, but check your local Home Depot or hardware store, OR click the link above and order online. The matte finish has just a touch of shine to it- it looks glossier in the photos but in person it’s minimal. It’s beautiful!

I painted two coats of green homemade chalk paint, using the color sanctuary in the Behr brand. Then I added a glaze finish. It was Valspar antiquing glaze. Lowes carried this in a 16-oz container for $14. Home Depot only carried a huge can of rust-oleum finishing glaze for $30.
The glaze is easy to apply. You brush it on thick and then wipe it off. It gets in the crevices and corners. You can wipe it off as much or as little as you desire. It brought a little more character and age to my dresser instead of it being stark new paint. I let this be my top finishing coat as well.
I painted the gold detail by hand on this old dresser makeover with gold acrylic paint and a small paint brush.
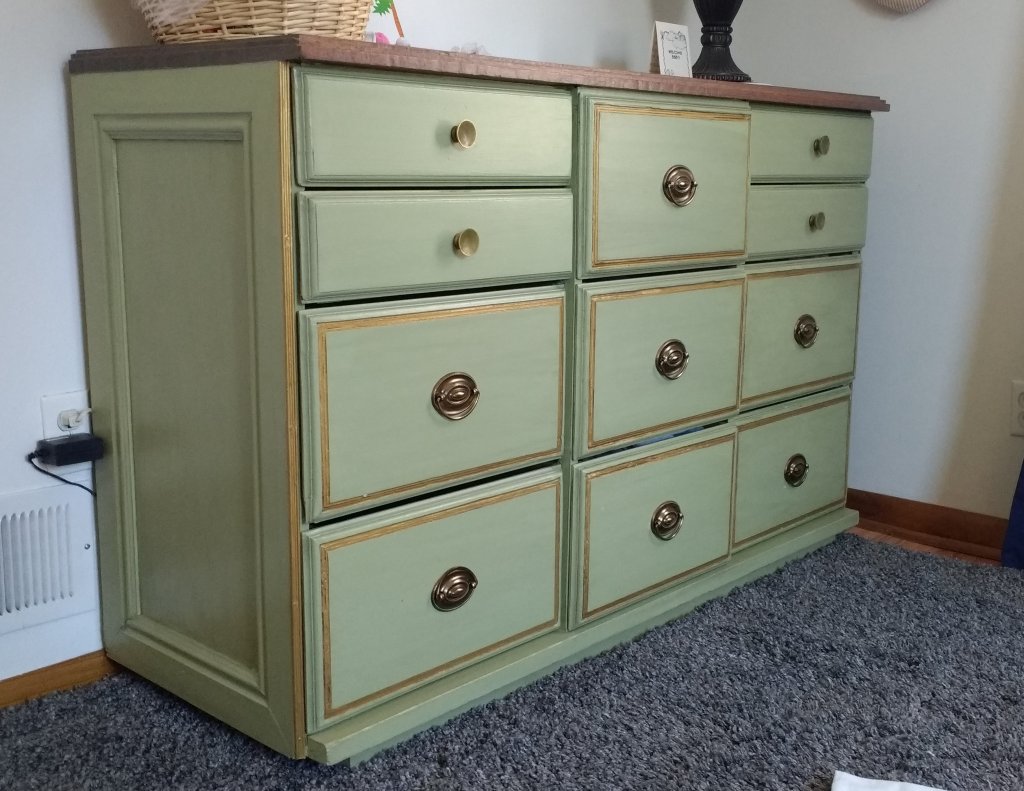
And Done! Two years later and this old dresser makeover still looks great.
Leave a Reply